Creating an animated clip of a character running on water can be a real challenge. Many animators get stuck on the physics and fluid dynamics, making it tough to achieve that realistic and engaging look. But don’t worry, I’ve got some solid advice for you.
This guide is packed with expert insights and practical tips from experienced animators. You’ll find step-by-step instructions and best practices to help you create a visually stunning animated clip.
Let’s dive in and make your sonic running on water gif (or any other character) look amazing.
Understanding the Basics of Animation
I remember the first time I tried to animate a simple character. It was a total mess. The movements were jerky, and the whole thing looked like it was made by a kindergartener.
Timing and spacing are the keys to making your animations look smooth and natural. Get those right, and you’re halfway there.
Squash-and-stretch is another principle that adds life to your animations. Think about how a ball bounces. It squashes when it hits the ground and stretches as it bounces back up.
This gives the illusion of weight and flexibility.
When it comes to tools, there’s a lot out there. Adobe Animate is great for 2D animations. Blender is fantastic for 3D, and Toon Boom Harmony is a powerhouse for both.
Each has its strengths, so pick the one that fits your project best.
Storyboarding is crucial. Before you even open your software, sketch out your scenes. Plan the sequence, the camera angles, and the key actions.
This saves you a ton of time and headaches later on.

Trust me, I’ve learned the hard way, and a little planning goes a long way.
Creating the Character
When it comes to designing a character for a running-on-water effect, you’ve got to think outside the box. First off, the character needs to be visually appealing. That’s a no-brainer.
But more importantly, they need to look like they can actually pull off this incredible feat.
Think about their build and attire, and a sleek, aerodynamic design works wonders. You don’t want them looking like they’re wading through mud.
Now, let’s talk about modeling and rigging. Whether you’re working in 3D or 2D, the key is smooth movement. Start by creating a basic model.
Then, set up the rig with joints that allow for fluid motion. This is where the magic happens. If the rig isn’t right, your character will look stiff and unnatural.
Texture and shading are next. Adding texture gives your character depth and realism. Use subtle gradients and highlights to make them pop.
Shading is equally important. It helps define the contours and adds a sense of weight and presence.
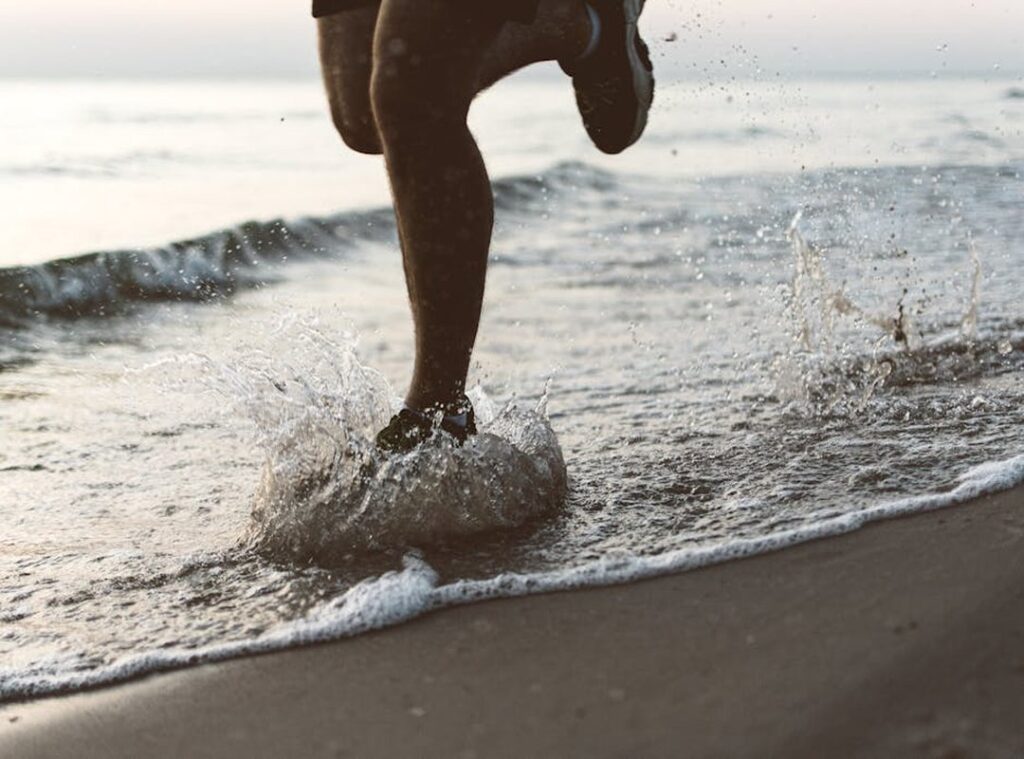
Here’s a quick tip: pay attention to the water interaction. The way the character’s feet touch the water should be seamless. (Check out this sonic running on water gif for inspiration.)
In the end, it’s all about balance. You want a character that looks cool and moves smoothly. With these tips, you’ll be well on your way to creating something truly special.
Animating the Character’s Movement
Animating a character running on water can be a real challenge. You want it to look natural and fluid, not stiff or robotic.
Keyframe Animation: Start by using keyframes to create the running motion. Focus on the main poses—contact, passing, and high point. This will give you a solid foundation.
Timing and spacing are crucial. Adjust them to achieve that realistic running-on-water effect. A good rule of thumb is to make sure the feet hit the water at the right intervals.
Too fast, and it looks like they’re skipping. Too slow, and it feels sluggish.
Secondary Actions: Don’t forget about the small, subtle movements. Hair and clothing should move with the character. These details add a lot of realism.
For example, if the character has long hair, it should flow back as they run.
Adding these elements makes the animation more believable. It’s all about the little things that bring the scene to life.
Here’s a quick visual to help you see what I mean: sonic running on water gif
By focusing on these key aspects, you can create a convincing and engaging animation. Remember, practice makes perfect. Keep tweaking and refining until it feels just right.
Simulating Water Dynamics
Water Simulation
I remember the first time I tried to simulate water in a game. It was a mess. The water looked like a flat, lifeless surface.
Not exactly the dynamic, flowing element I was aiming for.
Particle systems and fluid simulation tools have come a long way. These days, you can create some pretty realistic water effects. I’ve used particle systems to add splashes and ripples.
They give the water a more natural, lively feel.
Interaction with the Character
Making water react realistically to a character’s movements is key. Think about Sonic running on water. 
When a character moves through water, you want to see those ripples and splashes. It adds a layer of realism that players notice. I once spent hours tweaking the settings to get the right splash effect when a character jumps into a pool.
It was worth it.
Reflections and Refractions
Adding reflections and refractions to the water can really enhance the visual quality. It makes the water look more like, well, water. You know, the kind you see in real life.
Reflections are especially important, and they make the environment feel more connected. When you see the sky or nearby objects reflected in the water, it creates a sense of depth and immersion.
Refractions, on the other hand, add a subtle but crucial detail. Light bending as it passes through the water gives it a more natural, transparent look. It’s these small details that make the difference.
If you’re looking for ways to connect with your family beyond the screen, try some fun, tech-free activities. It’s a great way to take a break from all the digital work and just enjoy each other’s company.
Adding Visual Effects and Policing the Scene
Visual effects can make or break a scene. Trust me, I’ve seen it happen. You want to add elements like mist, droplets, and light rays to enhance the atmosphere.
- Mist and Droplets: These can give your scene a more natural, lived-in feel. (Think of a forest after a light rain.)
- Light Rays: Use these to highlight key areas or create a sense of depth. They can really draw the viewer’s eye.
Next, let’s talk about lighting, and it’s crucial for setting the mood.
Lighting Tips
Good lighting can transform a flat scene into something magical. Here’s how to do it:
- Soft Lighting: Use soft, diffused lights to create a warm, inviting atmosphere.
- Directional Lighting: For a more dramatic effect, use directional lights to cast shadows and add contrast.
- Color Temperature: Adjust the color temperature to match the time of day or the mood you’re aiming for.
Now, for the final touches. This is where you really bring everything together.
Final Touches
Adjusting colors and adding filters can make a huge difference.
- Color Grading: Tweak the colors to match the overall tone of your scene. (A cool, blue tint for a night scene, for example.)
- Filters: Add subtle filters to enhance the mood. (But don’t overdo it—less is often more.)
- Fine-Tuning: Take a step back and look at the big picture. Make small adjustments to the composition until it feels just right.

Remember, the goal is to create a cohesive and visually appealing scene. Don’t be afraid to experiment and trust your instincts.
Exporting and Sharing Your Animation
Rendering your animation can be a bit tricky. You want it to look great and play smoothly. So, what’s the best way to do this?
First, make sure you’re using the right settings. High resolution and a good frame rate are key. But don’t go overboard.
Too high, and you might end up with a file that’s too big to share easily.
Now, let’s talk about sharing, and you’ve got options. Uploading to social media, YouTube, or animation platforms are all popular.
But here’s a tip: consider where your audience hangs out. If they’re on Instagram, maybe a short, snappy clip is better. For YouTube, a longer, more detailed video might work.
Ever thought about using a sonic running on water gif in your animation? It can add a fun, dynamic element. Just make sure it fits the tone of your project.
Lastly, always keep an eye on the latest trends. New platforms and tools pop up all the time. Staying ahead of the curve can give you a unique edge.
Bringing Your Animated Clip to Life
To create an animated clip of a character running on water, start by sketching the key poses. Focus on the fluidity and dynamics of the movement. Next, add in-between frames to smooth out the action.
Pay close attention to the interaction between the feet and the water surface for realism.
sonic running on water gif can serve as a great reference for the kind of dynamic and fluid motion you’re aiming to achieve.
Refining the timing and spacing is crucial for a natural look. Don’t rush; take your time to perfect each frame.
Practice, patience, and attention to detail are key to achieving a professional and visually stunning result.
Experiment with different styles and techniques, and refine your skills over time.
Share your creations with the community to get feedback and inspire others.
 Health & Wellness Contributor